
- WordPress Basics
- WordPress - Home
- WordPress - Overview
- WordPress - Installation
- WordPress - Dashboard
- WordPress Settings
- WordPress - General Setting
- WordPress - Writing Setting
- WordPress - Reading Setting
- WordPress - Discussion Setting
- WordPress - Media Setting
- WordPress - Permalink Setting
- WordPress - Plugin Setting
- WordPress Categories
- WordPress - Add Category
- WordPress - Edit Category
- WordPress - Delete Category
- WordPress - Arrange Categories
- WordPress Posts
- WordPress - Add Posts
- WordPress - Edit Posts
- WordPress - Delete Posts
- WordPress - Preview Posts
- WordPress - Publish Posts
- WordPress Media
- WordPress - Media Library
- WordPress - Add Media
- WordPress - Insert Media
- WordPress - Edit Media
- WordPress Pages
- WordPress - Add Pages
- WordPress - Publish Pages
- WordPress - Edit Pages
- WordPress - Delete Pages
- WordPress Tags
- WordPress - Add Tags
- WordPress - Edit Tags
- WordPress - Delete Tags
- WordPress Links
- WordPress - Add Links
- WordPress - Edit Links
- WordPress - Delete Links
- WordPress Comments
- WordPress - Add Comments
- WordPress - Edit Comments
- WordPress - Moderate Comments
- WordPress Plugins
- WordPress - View Plugins
- WordPress - Install Plugins
- WordPress - Customize Plugins
- WordPress Users
- WordPress - User Roles
- WordPress - Add Users
- WordPress - User Photo
- WordPress - Edit Users
- WordPress - Delete Users
- WordPress - Personal Profile
- WordPress Appearance
- WordPress - Theme Management
- WordPress - Customize Theme
- WordPress - Widget Management
- WordPress - Background
- WordPress Advanced
- WordPress - Host Transfer
- WordPress - Version Update
- WordPress - Spam Protection
- WordPress - Backup & Restore
- WordPress - Optimization
- WordPress - Reset Password
- WordPress Useful Resources
- WordPress - Questions and Answers
- WordPress - Quick Guide
- WordPress - Useful Resources
- WordPress - Discussion
WordPress - Backup & Restore
In this chapter, we will study how to Backup & Restore files and database in WordPress. In WordPress there are two parts of backing up such as −
- WordPress Files Backup
- WordPress Database Backup
- WordPress Files Restore
- WordPress Database Restore
WordPress Files Backup
To get the backup files of WordPress, you need to install FileZilla Client on your system.
Following are the simple steps used for files backup operation in WordPress −
Step (1) − Open the FileZilla Client as shown in the following screenshot.
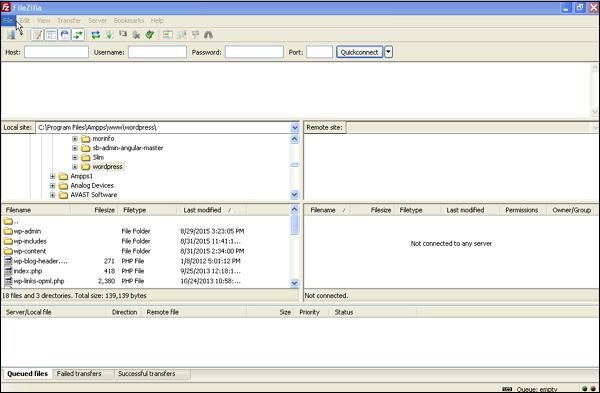
Step (2) − Enter the Host, Username, Password and Port like you have used to log-in to your cPanel.
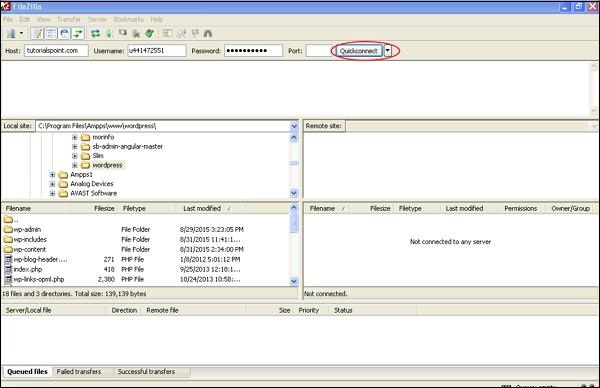
After filling all the fields, click on Quickconnect button.
Step (3) − You will get all files and folders of your WordPress site on the right side as seen in the following screen.
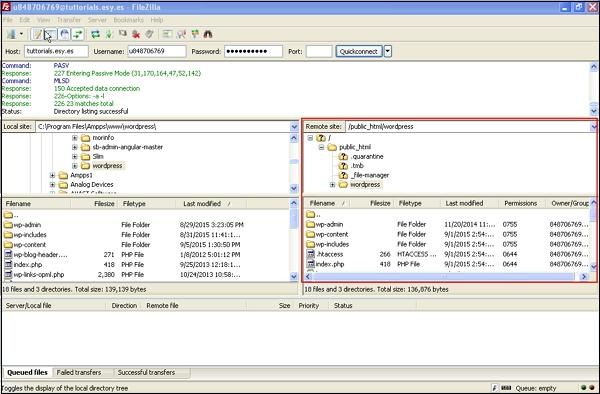
Step (4) − Select all the files and folders and right click on the mouse and click on Download.
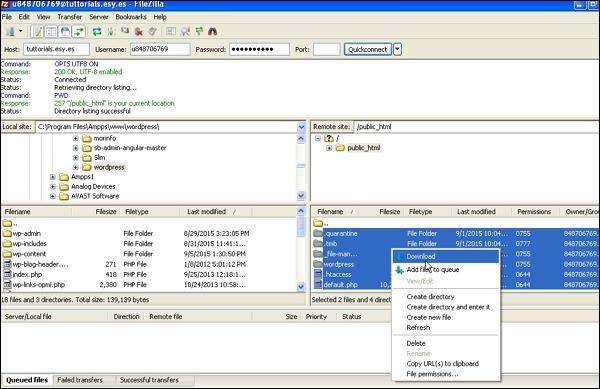
After downloading the WordPress files from cPanel, it will be saved on your system.
WordPress Database Backup
Following are the simple steps for database backup in WordPress −
Step (1) − Type the path http://localhost/phpmyadmin in your browser. You will get the following screen.
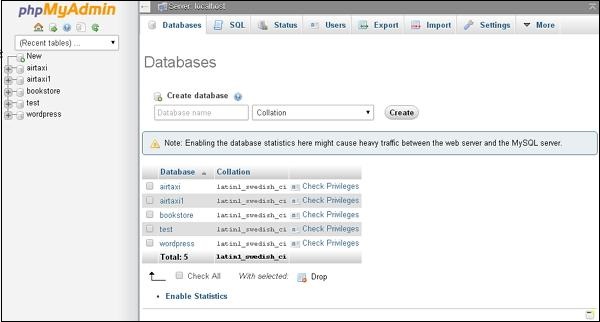
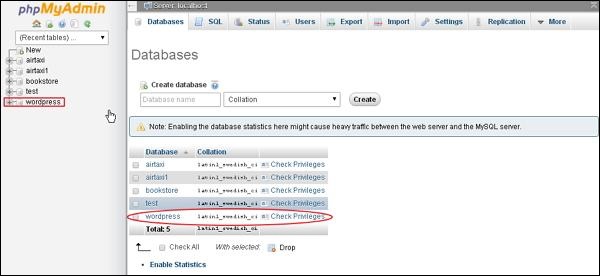
Step (2) − Click on the database name ‘wordpress’ which you have created for WordPress.
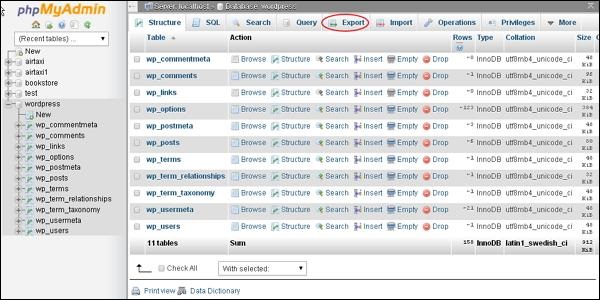
Step (3) − After clicking on database wordpress, it will open the following page. Click on Export tab.
Step (4) − You will get two methods to export the database i.e. Quick and Custom. Select any one of the methods and click on Go button.
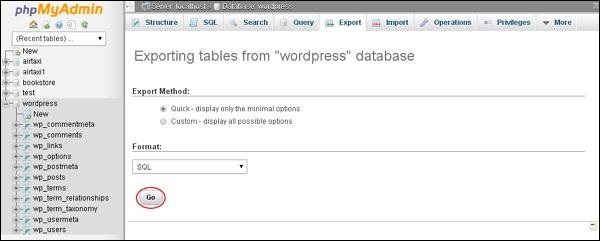
After exporting the database file, it will get saved on your system.
Restoring WordPress Files
Following are the simple steps used to restore the files in WordPress using ftp −
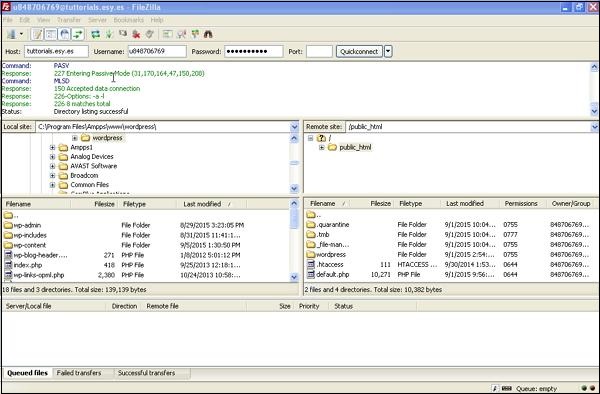
Step (1) − Open the FileZilla Client and login to your site using ftp as shown in the following screen.
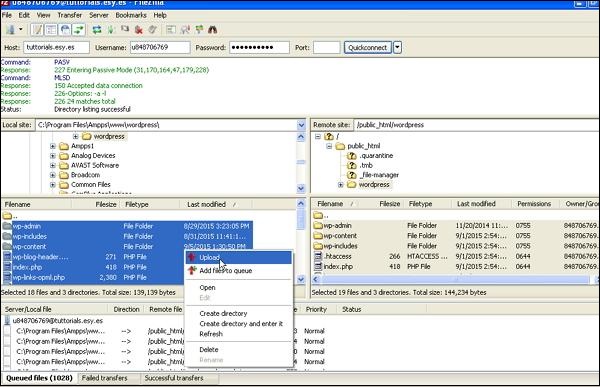
Step (2) − Open the local directory in ftp and upload all WordPress files to your website as shown in the following screen.
Step (3) − Then, go to your wordpress folder → wp-config.php file. Copy and rename wp-config.php file before editing, in case of some mistake you can restore this file back.
Open the wp-config.php file and locate the following code.
define('DB_NAME', 'db_name');
Replace the db_name with your database name which you have created.
define('DB_USER', 'db_user');
Replace the db_user with your username of MySql.
define('DB_PASSWORD', 'db_password');
Replace the db_password with your password of MySql.
Save your wp-config file after editing and upload it to your WordPress site through ftp.
Restoring WordPress Database
Following are the steps used to restore the database in WordPress −
Step (1) − Type the path http://localhost/phpmyadmin in the browser. The following screen will pop up.
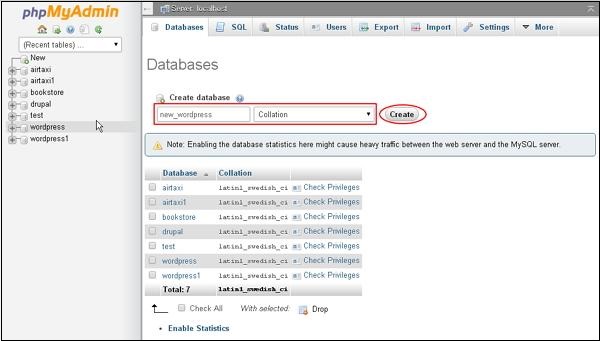
You can create a new database or import your backup in the existing database.
Here we'll create a new database name, i.e., new_wordpress and click on Create button.
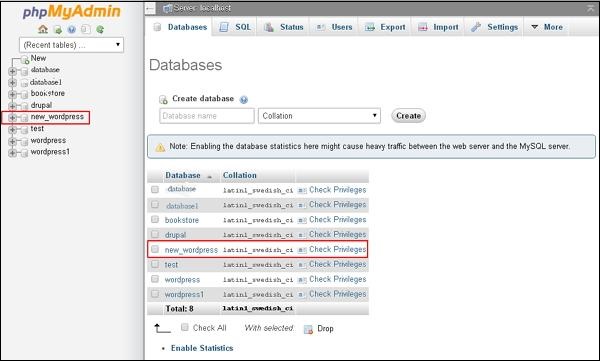
Step (2) − You can view your created database as shown in the following screen. Click on the database name new_wordpress.
Step (3) − Click on Import.
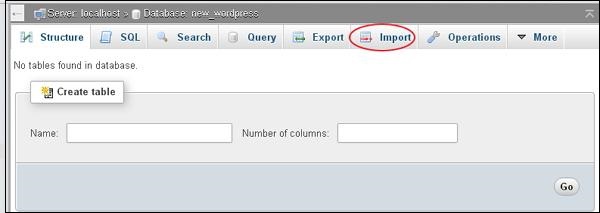
Step (4) − Click on Choose File button to select the backup file from your system. After uploading the sql file, select format as SQL as shown in the following screen.
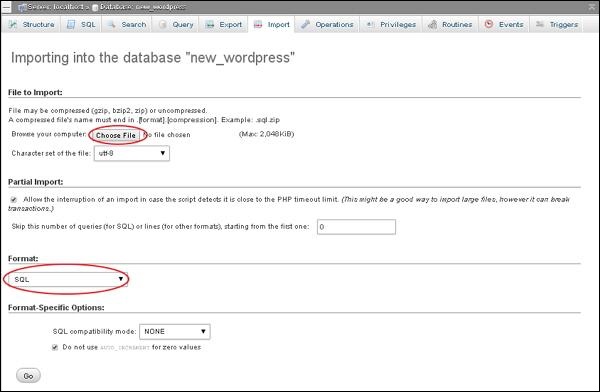
Click on Go button.
Step (5) − Once you click on Go, you will get a message after the sql file is uploaded successfully.


To Continue Learning Please Login